Saturday, April 11, 2009

External tank design 8x4x4 feet

 Before moving into our new house last year, I had approximately a year to design and plan while waiting for the developer to finish their works. And part of my delirium, I've always wanted a nicely setup external pond, a sorta haven away from the noise and bustle, and craziness of life, a place of meditation, of the sounds of water gurgling away....but alas! Time and money did not allow, ah well! So, here were my designs that were drawn up using Google's Sketchup. A readily powerful tool, that any avid noob can easily pick up to draw their glorious dreams of grandiose. 

This fits my small lil' 8 by 4 feet piece of grass turf in my yard. It's to be at least 4 feet in depth, with an extra 2 feet for the filtration system. The idea for the filtration comes from our normal, aquarium tank overflow where filtration works because of the equilibrium in water pressure. Basic cement doesn't really work well in this setup as cement is only semi-waterproof. Mixing cement with waterproofing compounds will prevent it from being porous but not prevent it from cracking, which is always the fear in building cement ponds. The other suggestion is to look for sheets of rubber pond liner that you can lay into the tank. Pets Wonderland in Ikano sells them, but their biggest pieces were only 6 by 6 feet costing below RM100 though! Or maybe to paint over with a latex paint. The most durable and what most people do for koi pond is to fiberglass it in the end! Obviously this ends up doubling the price of your tank :( But it becomes more of a permanet setup then!


From the top view of the tank, you can see three sections, with 3 access pipes (for cleaning purposes). The last portion is suppose to be for filtered water, that is to be pumped back into the tank. And as you empty the last tank, water pressure will force whatever debrie from the tank, into the first section and thus the filtration works. 

The tank is actually sloping downwards towards the filter. This will allow whatever debris/dirt to collect at the bottom which will work something like a sump pit. This is then connected to the first of the filter section via an unground pipe. 

As you can see, the filter is left open as I was planning to make this sections out of glass. 2 big pieces and a whole lot of silicone to glue it to the cement works. I was told this works in construction, yet to try :)

The external pipe above is actual a water outlet pipe from the roof gutter! Originally, this ran underground and I thought this wouldn't be so fun as to have it burst under my tank setup! It'd be a major problem repairing it then. As such, i was planning to extend it above. This could be hid with plant growth or maybe some amount of woodworks. All access water will overflow out, through the main sewage line. Having the extra 3 access points allows for easier cleaning as all you'd have to do is to open the outlets, while stopping the water-flow from the main tank. Scrub clean washed throughly with an external access pipe makes life easier. But there's always the worry of th outlets leaking or bursting as this may actually drain your entire tank! Hence, the reason to have the outlet allevated at least 6 inches above with extra piping which you can then remove when you're cleaning!

One other thing to plan is to install and automatic refill system that will top up the tank whenever the water level drops below a certain level! Which sorta works like your normal flush toilets! At least that'd remove the hassle of topping up the tank ever so often! 

As you can see, this is just an experiment that never went into an actual development stage. It is also a work in progress. Lots of external stuffs are left off, like the filter pumps, the reverse waterline going back into the tank. The wooden cover which I did plan to get as having kids with these things in mind isn't practical if you can keep it covered at all times!

 As such, most of what I have here is base on best practises and what I've gotten from other people's pond design. So saying, do work with practicality and common sense yah if you were to use this! This sketchup can be downloaded from here! do let me know if you've actually made your pond, would love to see the end-result! Oh and yeah... anyone out there wanna sponsor my tank? :P


Sunday, April 5, 2009

Batu 14 Noodle Shop

The nice thing about this noodle-house is that it's good simple cooking conveniently nearby! A big bowl of soupy ikan billis (anchovies) stock panmee plus a good big cuppa cham (tea+coffee) usually comes up to be approx RM6. I've never been really good at remembering the costings, as we're usually there for more the one order of something! And as usual when it comes to hawker food, depending on weather patterns, fish market trends and boss's mood on that day... it's quite iffy, to say the least! Erm, also I don't think i got the name of the shop right as it doesn't translate directly from the signboard. Sorry, don't know how to speak mandarin and my colleague who i'd rely on translating this is too lazy to bother helping! :P

A big bowl of panmee with all the usual condiments, pucuk manis (Sauropus androgynus), fried anchovies, black fungus and if u've been a good boy/girl, some pork balls! (obviously, u'd have to order this separately!). Oh and of course this shop does panmee with eggs! with extra cost though! 

The usual cuppa joe, or in my case, cham which as you can see compliments to the coffee sommelier who mixed my drink, consist of 3 layers. First being condensed sweeted milk, the middle tier's tea and the top most layer is coffee! 

Of course, eat your vegetables! Oh yeah, don't forget that a good bowl of panmee comes with  really sambal consisting of chilli padi, lime, some amount of sugar, onions, garlic, and most importantly, belacan! All blended up and serve with a dash of soya-sauce! I'd probably left out something, or didn't get my quantities right as somehow I don't seem to be able to get it right!

Their speciality is the panmee but they do have yee mee too. Panmee comes in two version, dry and soup base. Portions are huge though! So caveat emptor people :) They may have other stuffs which i've yet to try, 'cause we're mostly there for the panmee! And because it's very near the Han Ming primary school of Puchong, it gets crowded as most parents would have their lunch while waiting or dropping their kids off! Parking a breeze during non-peak, as there's a piece of open land directly across from the shop. Here's a picture of the front of the shop, according to a friend of mine, it says Raub! 

So here's a map to the place! do let me know what you think if you do go by! :)

Syarikat City Corporation - In need of CO2 refills!

Just when everything was running fine, my tank decided to run outta CO2! So, last friday... we took a leisure drive down to Taman Sungai Besi in KL, on a hunch from MAC that one could get a refill for RM10!  After a 20mins drive, passing the Nirvana Memorial building on the left, you'd find Taman Sungai Besi a short distance away. It took me less then 10 minutes to get my tank refilled with 2KG worth of CO2, cheap, efficient and fast... what more could one ask for! Do call in advance as i did find out that the person who does CO2 refills, actually stops work at 4:30PM. Also mention that you're getting a refill for your aquascaped tank, as it seems this gets you the good rates mention in MAC! Thanks to the folks on MAC, this is by far the cheapest find for CO2 refills all over KL! 

You can find a google map here!

Address is :- 30, Jln 13/108C, Tmn Sg Besi, 57100 KL. 
Tel 03 79833214/79836366

Saturday, March 28, 2009

2x feet Aquatic planted tank setup 2009 2.0


29'th March, 2009, it's been a week and two days and here's some progress. The water-poppies, mosaic plant and water pennywoth are growing taller! Also, I notice that I've got small shoots for the pennywoth too! As for the swordplant, not much growth but i did notice pearling from the second day onwards. It's a rather satisfying feeling one gets when seeing your plants pearling and knowing all things are hopefully gonna be fine! Or so i'd wish, lol! If u squint a lil', the swordplant's actually pearling a string of bubbles to the top of the tank! Even some of the java-fern and pennywoth has lil' bubbles on their leaves. It's beautiful when the sun-rays hits the tank, n stuffs starts happening :) Unfortunately, along with everything else in the tank, even the green slimy moss would bubbles away! Jeez, stubborn algae this is, i've even tried taking a toothbrush to it with no avail! Only hope is that everything outgrows it and it'd die a natural death! :P


Two days ago, i actually trimmed off two leaves from the sword plant... and if u'd notice from the picture below, it's turning yellow from the inside out! It's happening to a few of the older pennywoth too! Some say it's a nitrogen deficiency, others potassium... but i've been fertilizing with tulip tablets! But i can't be sure at all, would have to research more though...!!

Here's the tank after a week, u'd notice the plants have stretched out... unfortunately, it's not the same for the glosso!! The glosso leaves are getting trashed and i'm not having much hope on it as my light's very much dependent on sunlight n the weather these days hasn't been the greatest. After YY's reprimand on putting in glosso prematurely, i'd say to heck with it! :P But surprise suprise, i do see one single baby leaf coming out, unblemished, pure! Will this be my one and only glosso survivor! The one n only survivor?! Lol...we'd find out overtime i guess! 

Oh yeah, and here's my diy light fixture, using a downlight box and the Philips 23W Brightlight CFL. Obviously, there's a chance of the whole entire thing short-curcuit-ing and burning my whole house down, even it being earth-ed... I'd only use it with supervision. The stand's actually a cloth-hanger, bended to clip onto the side of my tank. Thanks to MACC for this suggestion! 

Some pictures of the glosso in the tank! As you can see, they aren't the happiest of plants at the moment! Oh yeah, here are the newest edition to my tank, 3 pairs of red wag platies as per suggestion by YY to kick-start the nitrogen cycle! I'm also hoping that this guys would help eat up some of the green algae in the tank and over the days, I've also notice green crap all over the tank! Maybe is, maybe not?! :P Photos for the next update, yah!


If you look at the background, you'd notice the bottom portion of the mosaic plant! 


Thursday, March 26, 2009

2x feet Aquatic planted tank setup 2009 1.0


After many of nights planning and running permutations on the golden mean rule in my head, I've decided today'd be the day we be aplanting! Over the months since SLS, I've been parts shopping and researching that I've got everything require to setup my next planted tank. Hoping for a sunlight tank ala Diana L. Walstad (not all the way though), I didn't spent too much on lights as I was planning to place this tank outside in my yard (Seeing as you can't really baby-proof a pressurized CO2 canister along with a 15Gallon aquarium filled tank!). The first time i setup this tank, I had an old 2feet aquarium from my old apartment which i was planning to use; it was temporarily hosting a 6inch tortoise my old man found from around our neighbourhood! Alas in my ambitious plan to provide it more creature comfort i cracked it placing in a ceramic pot!! Would have chunked the entire project if it wasn't for all the work and purchases made already :) And wifey being her ever-supportive self, said i could purchase a new tank (this is after hours or trying to self-repair and dragging her to 3 LFS consequtively asking if they'd repair a cracked tank...)

After our Klang Panmee session I dropped by Xian Leng to purchase 2 pieces of driftwood for my tank, spending approximately rm15 on them

Below is the first layer that went in. It's pure laterite; which i use pure for most of my water-potted plants, ie. water-pennywort, water-poppy and mosaic plants. It's supposedly virgin soil, purchase at this nursery in Dengkil. According to the nursery-owner, the soil is actually dug from uncharted hills around the area, so it's supposedly pure of any "bad stuffs"! Well, it works wonders for tulips and water-lilies which is what they're specialized at :)

The second layer is a blend of planting soil from a friend. I've left it behind in my "cabbage-patch" for a past few months to leech away the bad-stuffs :P. The recipe for the second layer comes from Jim Kelly, he wrote an article entitled "Aquarium Technology for the Very, Very Budget Minded". Thank a bunch Jim :) So the second layer is potting soil mixed with vermiculite. 

So, here are the three bags of stuffs that went into the substrate. Potting soil is RM4, Vermiculite is RM7.60 from Ace Hardware and the Laterite virgin soil is RM3. Coincidentally, i went back to the nursery in Dengkil and was told that they've stopped digging for it! Wonder if anyone out there knows of any other nursery carrying these rich-laterite type soils? 

And lastly, the third layer of holland sand purchased from SLS the last trip there! 

Here are the plants i've purchased! A bunch of java-ferns going for RM10, there were nearly 5 saplings making the entire group here. Hopefully they'd all survive :)

I can't seem to figure out what plant this is! Anyone's got any ideas? Cousin's of hornworth maybe? Going for RM2 per bunch

Glossostigma at RM5Sword plants for RM2! My mistake on this guy, YY :P I totally forgotten my plant dictionary. Someone should come out with a definitive guide of 'em plants :) lol! Three more plants which I already had were thrown into the mix, water pennywort (Hydrocotyle spp.) some mosaic plant (Ludwigia sediode) and water poppy(hydrocleys nymphoides) . I may have the genus wrong, so guys if u spot the right plant, do tell me! 

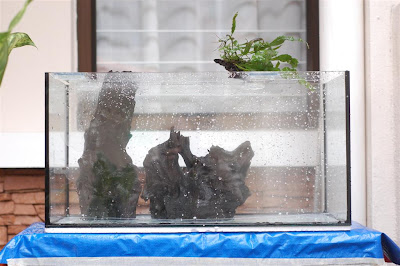
Sideview of the tank

Frontview shot...

Glosso on the substrates... I was told later to have waited a while, to cycle the tank before putting glossos in (Thnk YY!), and am paying the price now, as i'm seeing them getting covered by algaes! Aiyak...lesson to learn i guess :P

Here's the tank filling up with water. Tips from Siang to place a piece of plastic so that the water pressure doesn't end up stirring up all your hardwork! 


Oh yeah, by the way... I run a china brand canister filter with a CO2 tank plus diffuser purchased from Galaxy Pet Links in Damansara Uptown, total approx RM400! As for lights fixture i DIY-ed a down-light fixture with Philip's latest BrightLight 23W CPL (6500K, 1600lumens with 82CRI, good measurements for photosynthesis i hope). Forgot to take a picture of it, will post in part 2! Oh as for the frame, it's a 2feet tank frame, purchase from Irene's nearly 6 years back!! It's so old that i don't even remember how much i paid for it :P lol! 

So here's how the tank looks on the first night! Eveything's in a dis-array! Last but not least is the budget spent thus far running a bill of RM175 on new stuff! I convince myself that most of these things are recyclable... i hope! Oh and those who have an idea of where i went wrong, please help!! Last update, the plants seems to be dieing... !! Shall cover that in the next update

1 . Light fixture RM 16 2 . Philips 23W 6500K CFL RM 18 
3 . 2xfeet tank RM 20  
4 . 2xSilicone sticks RM 16  
5 . Vermiculite RM 7.1  
6 . Trio Potting soil RM 4  
7 . Laterite virgin soil RM 3  
8 . Plant purchased RM 23  
9 . Tarp RM 6 
10. 2xdriftwood RM15 
11. Holland Sand RM 18  
12. 2xtank rm25
13 . Old CO2 tank RM 140  
14 . Old Canister filter RM 130  
15 . Old CO2 diffuser RM 20  
16 . Old bubble counter RM 8  
17 . Old check valves RM 3